Introduction
If
you’ve never edited in 3D before, this introduction will help
you get into Worldcraft quickly.
E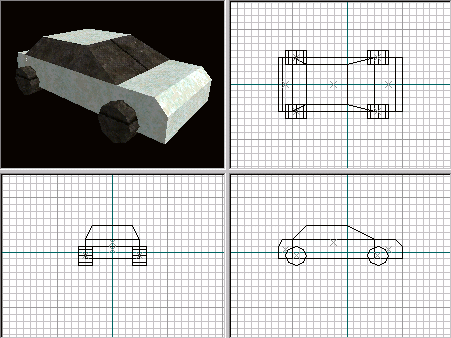
diting
in three dimensions on a two dimensional monitor means that the
subject (in this case, a Half-Life map) must be displayed in several
different perspectives. Worldcraft, like many CAD programs,
uses four perspectives to render what you’re editing:
In
clockwise order, starting at the top, left window:
The 3D view displays the map in three dimensions. It’s a
fairly accurate representation of what the map will look like in the
game – the only detail it’s missing is proper lighting.
Architecture and texture placement are perfectly rendered.
The 2D X/Y view displays a bird’s eye view of the map, as
though you are looking down on it.
The 2D X/Z view displays a side view of the map.
The 2D Y/Z view displays a front view of the map.
T ip:
use the three buttons on the top toolbar to change the type of
rendering performed in the 3D view, in order: wireframe, solid
polygons, and textured polygons.
ip:
use the three buttons on the top toolbar to change the type of
rendering performed in the 3D view, in order: wireframe, solid
polygons, and textured polygons.
S elect
the Camera tool to move around in the 3D view – hold down the
left mouse button to rotate and tilt the viewpoint, the right mouse
button to strafe (move side to side) and change the altitiude of the
viewpoint, and the D and C keys to move closer and further away from
the objects in the viewport.
elect
the Camera tool to move around in the 3D view – hold down the
left mouse button to rotate and tilt the viewpoint, the right mouse
button to strafe (move side to side) and change the altitiude of the
viewpoint, and the D and C keys to move closer and further away from
the objects in the viewport.
Most
editing is done in the 2D views. To move around in the views, use the
side scrollbars or hold down the spacebar and the left mouse button
to drag the view. You can zoom in and out on the objects in the view
with the plus and minus keys on the right keypad.
Basic tools
Creating
maps with Worldcraft is similar to using most drawing tools. You can
use the mouse for pretty much everything – drawing objects,
modifying their properties, moving them and changing their shape,
etc.
Creating
solid objects is easy. Select the block tool on the left toolbar. In the top, right view, click the left mouse button and drag a box.
The box is drawn in all three 2D views.
In the top, right view, click the left mouse button and drag a box.
The box is drawn in all three 2D views.
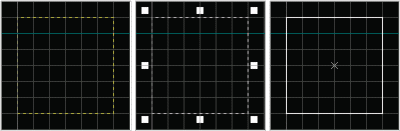
T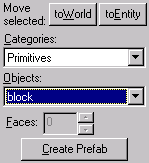
his
illustration shows the three steps of creating a new object:
Drag a box out.
Release the left button – you can resize the box in the other
views here.
Press ENTER to create the object.
You
can create several different types of objects: a plain box, a wedge,
a cylinder, and a spike. Select the kind of object you want to create
before you press ENTER by clicking on the “Objects”
drop-down list on the right toolbar.
S
elect
the pointer (selection) tool. Click on the center handle of an object
or on one of its lines to select it. You can now manipulate the
object by stretching it, rotating it, and slanting it. Click on one
of the handles surrounding the object and drag with the mouse to
change its shape. To select another manipulation mode, click and
release inside the box without dragging the mouse. You’ll
notice that the number of handles around the box changes each time
you click it:
resize: the eight square handles allow you to resize the objects in
eight different directions.
rotate: the four circular handles allow you to rotate the objects to
any angle.
shear: the four square handles allow you to slant the box vertically
and horizontally.
move: you can always move the selected objects by click-dragging
inside the box and not on any handles.
If
you want to select more than one object, hold down the CTRL key and
click on more objects. You can also drag a “rubber band”
around several objects to select everything within the region. Simply
drag out a box with the pointer tool (much like you did to create a
solid) that encompasses the objects you want to select. Then press
ENTER to select those objects. You can manipulate multiple objects as
easily as you manipulate one.
Making a level
The
simplest enclosed level you can play in Half-Life is a cubic room
made of six walls and a player start. You might think that you’d
be able to create a room with just one box, but that’s not the
case. In editing half-life maps, every solid object you create with
the block tool is exactly that: a solid object! To create a cubic
room, you need to create one solid for each wall, for a total of six
solids.
C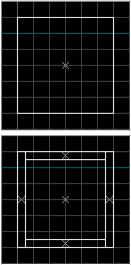
reating
six solids seems like a lot of work for a simple room! Worldcraft
makes this task easier by providing you with a hollowing tool.
This tool allows you to hollow any solid object to have walls of a
specified thickness. So, you need only create one solid cube and use
the hollow tool to make it a playable room. Here’s how:
First, create a box with the block tool. Make sure you adjust its
height in one of the bottom two views after you create it (the
default height is 64 units, if you create the object in the X/Y
view, which is not high enough allow a player inside after the
object has been hollowed.)
Then, select the object with the selection tool and choose Hollow
from the Tools menu. You’ll be prompted to enter how
wide you want to make the room: the default value of 32 is fine.
Press OK.
The
box you created will be turned into six solids, one for each wall.
There’s
one more step required before you can run the map in Half-Life, and
that’s to create a player start entity. When the player
enters the level, he or she is placed at the location of this entity
– without one, the level won’t run.
Entities
differ from solid objects in that they’re just a point in space
– a placeholder for something to appear when the level is
played in Half-Life. Other examples of entities include monsters,
health packs and weapons.
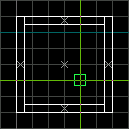
T o
create an entity, select the Axe tool. Click the left mouse button in
the top, right view to begin placement of the entity. Drag the center
of the crosshair so that it’s inside the room in all three
views.
o
create an entity, select the Axe tool. Click the left mouse button in
the top, right view to begin placement of the entity. Drag the center
of the crosshair so that it’s inside the room in all three
views.
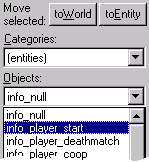
Now,
select the player start entity from the object bar (the same place
where you chose which kind of solid to create.) Click on the objects
list and scroll down to the info_player_start entity. Press
ENTER to create the object.
Now
you’re ready to run your first map in Half-Life. Press F9, then
ENTER, to go!